 By myulikeadmin
Age, genetics, an unhealthy lifestyle, bad eating practices, irregular exercise, and stress all contribute to belly fat. By adding some yoga asanas to your regimen, you may be able to reduce your belly fat since they aid in burning calories, increasing muscle flexibility, and boosting metabolism. You can lose belly fat by doing yoga and eating a balanced diet. All you have to do is follow the plan and practice the yoga poses consistently.
10 Effective Yoga Asanas To Reduce Belly Fat
1. Naukasana (Boat Pose)
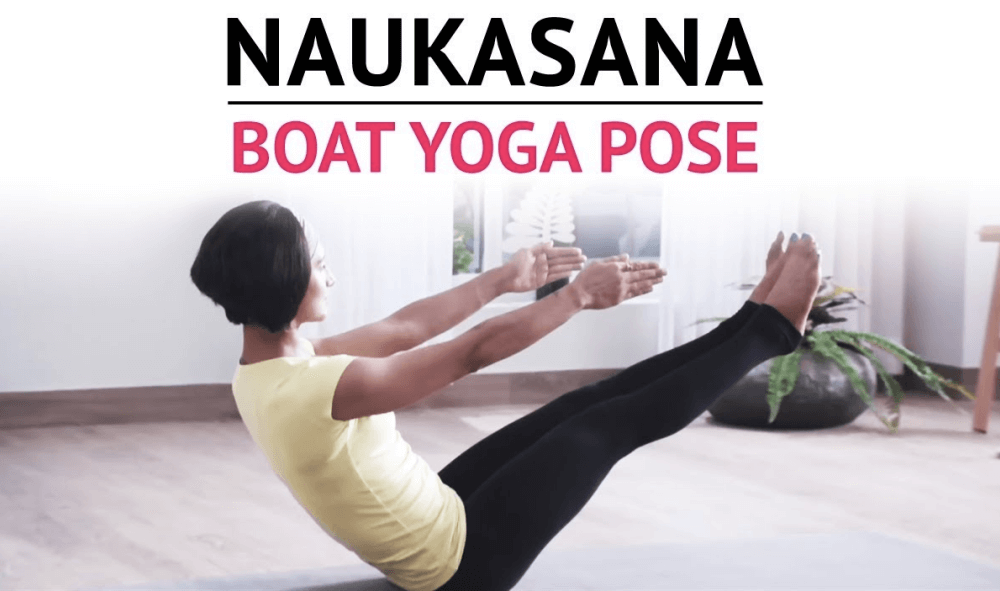
One of the most popular yoga poses, Naukasana, will flatten your stomach if you practice it frequently. While maintaining the position for longer than a minute helps to contract the abdominal muscles, maintaining the position while moving like a boat may aid to tone your abs.
How to do Naukasana
● Lay on your back on the yoga mat with your legs extended, your toes pointed upward, and your hands facing the ground on either side of your body.
● Deeply inhale. Lift your entire body off the floor as you exhale, including your head, chest, and legs.
● Extend your arms out so they are in a straight line beside your legs.
● Your toes and fingers should be aligned in a straight line. Look down at your toes.
● You need to feel your abdominal muscles contracting as you maintain the position.
● Hold the position for 30 to 60 seconds at first while breathing normally.
● Breathe deeply, exhale gently, and then slowly relax as you return to the supine posture.
● Start by doing this pose five times, and then gradually increase it to 30 times. Following each repetition, take 15 seconds to unwind.
2. Uttanpadasana (Raised Foot Pose)

This position works the hip and thigh areas as well as the rectus abdominus and related abdominal muscles. In this position, you can get rid of the extra belly fat that builds up around your hips and waist while you’re pregnant.
How to do Uttanpadasana
● Your back should be on the ground, your legs should be extended, and your heels should be in contact. Hold your hands by your sides, palms down toward the floor.
● Take a long, deep breath. Now slowly exhale and tilt your back while positioning your head such that your ears are parallel to your shoulders.
● Keep your hands where they were when you started. Take a normal breath.
● Stretch as far as you can without endangering your back.
● After taking a deep breath, lift your legs off the ground so that they are at a 45-degree angle.
● Keeping your breathing regular, hold the position for 15 to 30 seconds. Work slowly to maintain the position for more than 60 seconds.
● Deep exhale, then straighten your legs so they form a 90-degree angle with the floor. Hold the position while breathing normally for 30 seconds.
● As you slowly return your legs to the initial position—the supine position—breathe deeply.
● Start by repeating this pose 10 times, then gradually increase that number to 30 times.
3. Bhujangasana (Cobra Pose)
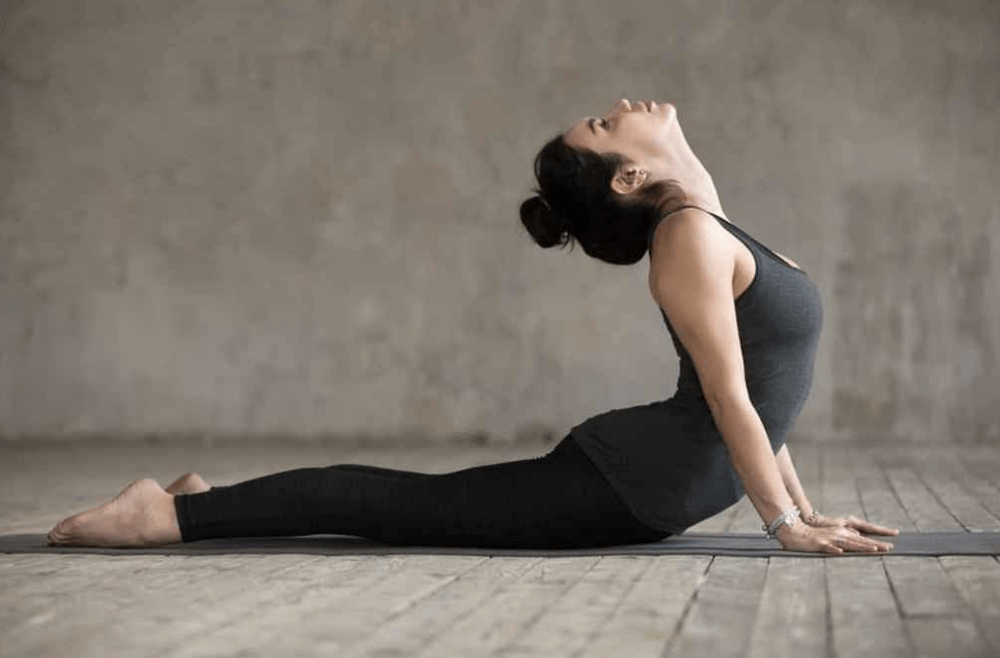
Using this yoga pose, you can effectively stretch your abdomen. This pose is one of the most suggested ones to relieve post-partum back pain since frequent practice helps to strengthen the back muscles.
How to do Bhujangasana
● Your chest should be facing the ground while you lie prone on the mat with your legs slightly apart and your toes touching the ground.
● Hold your hands by your sides, palms down toward the ground.
● Put your palms down just below your shoulders.
● Taking a deep breath, slowly elevate your head and torso off the ground while maintaining a steady stare at the ceiling. Keep your buttocks firm and tuck your pubis in toward your navel.
● Maintain the position while breathing normally for 15 to 30 seconds.
● By taking a deep breath and bending as far back as you can, try to elevate your body from the waist up. But watch out that you’re not doing any damage to your back.
● With your breathing regular, maintain the position for 30 to 60 seconds.
● Exhale and slowly lower your entire body back to the prone position, including your chest, neck, and forehead. Slowly extend your arms in front of you.
● Start by repeating this pose 10 times, then gradually increase that number to 30 times. Following each repetition, take 15 seconds to unwind.
4. Ustrasana (Camel Pose)
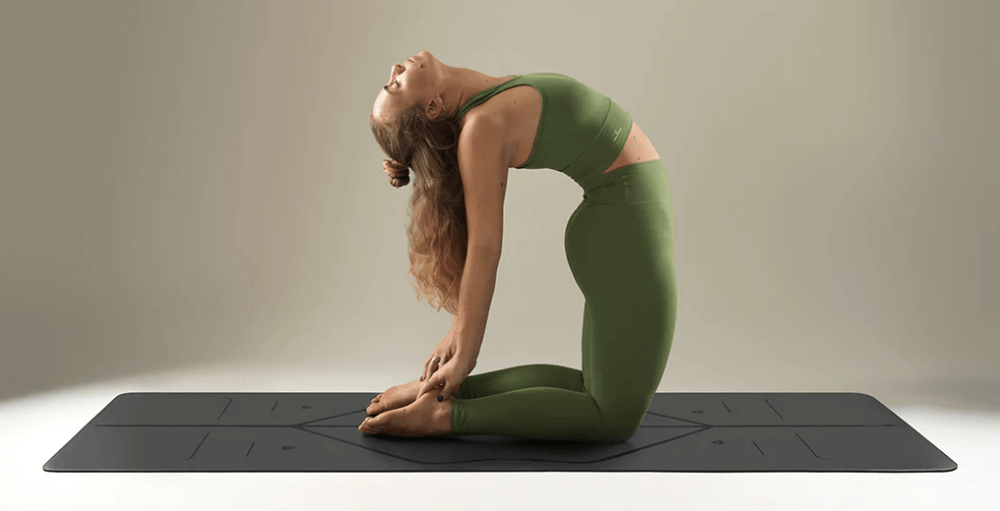
Usually, Ustrasana is performed to oppose the Naukasana stance. In this position, the backstretch you feel as you touch your ankles helps tone the abdominal muscles. Your belly muscles will now be freed of the tension they were holding during Naukasana, and you’ll also get a nice stretch.
How to do Ustrasana
● Sit in the Vajrasana position.
● Gently raise your torso off of your knees so that your entire weight is supported by your knees as you sit. (You want your heels to be parallel to the ground).
● Take a long exhale and raise your back. Try to grip each ankle individually by bringing your hands around to the back of your body.
● Stretch backward while tilting your head to the side until you feel a stretch in your tummy.
● Starting with 20 to 30 seconds, work up to 60 seconds while maintaining normal breathing. Exhale and unwind gradually.
● Start by doing this pose five times, and then gradually increase it to 30 times.
5. Marjariasana (Cow Cat Pose or Cat Pose)
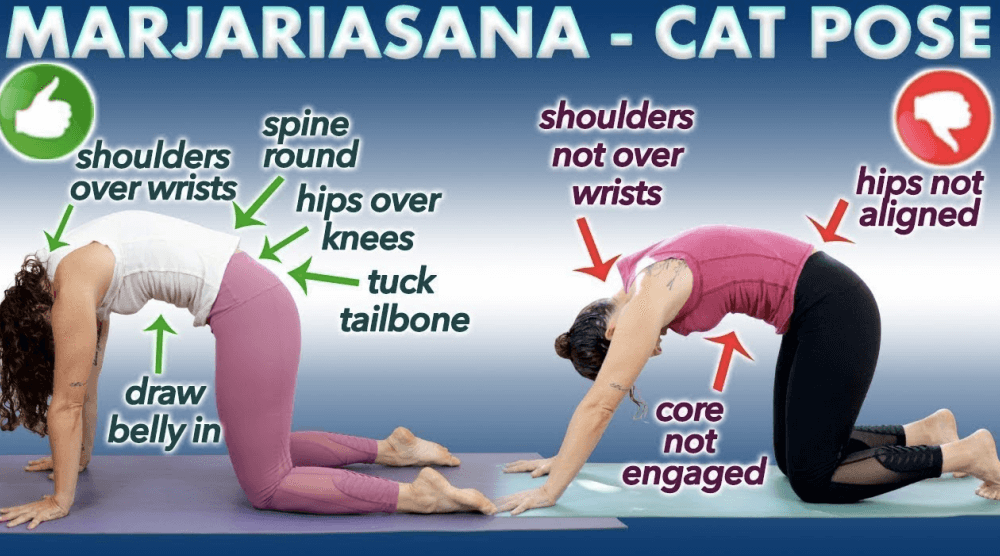
The posture causes the abdominal muscles to contract firmly, which helps to melt fat and minimize the size of the belly. This stance is very helpful for improving spinal flexibility.
How to do Marjariasana
● Sit in Vajrasana sitting techniques
● As you get out of the position, continue breathing normally and let your body slant parallel to the ground so that it rests on your knees and palms.
● Your hands must be towards the floor with your shoulders under your hips and your knees should be positioned beneath your hips. Maintain a straight back. To ensure that your weight is distributed properly, slightly space your knees apart.
● Take a deep breath in and raise your head while pressing your back down to create a concave shape in your body.
● Hold your breath while continuing to hold the position for 15 to 30 seconds.
● Exhale fully, lowering your head and raising your back in the process. Until you feel the contraction, maintain a strong position in your abdomen and buttocks.
● Hold the position while taking deep breaths for 15 to 30 seconds, gradually increasing the time to 60 to 90 seconds.
● Exhale and return gradually to Vajrasana. Take 15 seconds to unwind.
6. The Tadasana (Mountain Pose)
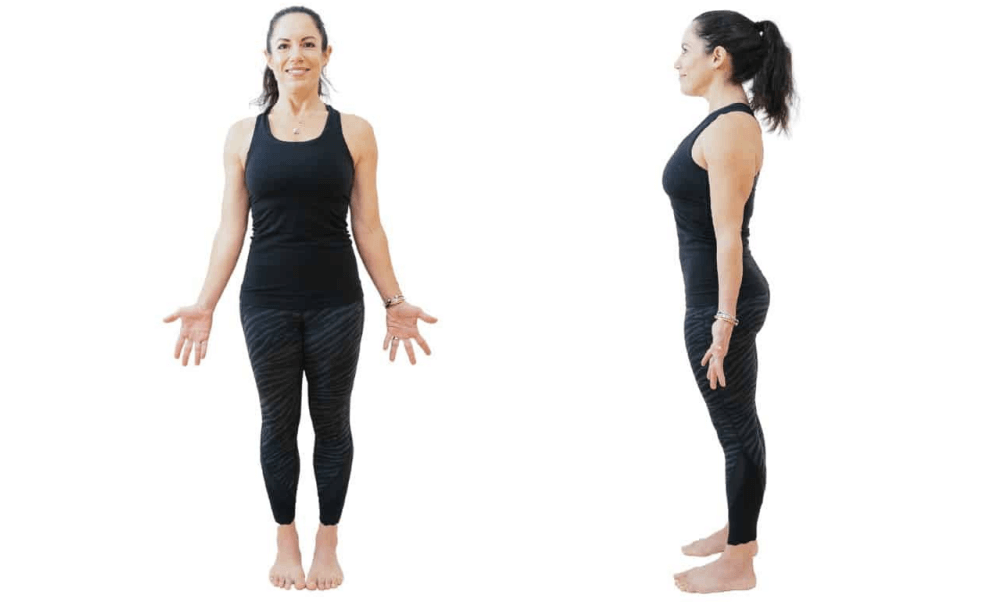
Another excellent warm-up position is the tadasana. It enhances blood flow, stimulates the core and other peripheral areas, and primes your body for upcoming poses.
How to do Tadasana
● Your big toes should be in contact with one another, your heels should be slightly apart, and your feet should be flat. With hands by your sides and palms towards your body, maintain a straight spine.
● Bring the palms of your hands together and extend your hands forward.
● While you breathe in deeply, extend your spine and stretch as far as you can while holding your hands in a folded position over your head.
● Stand on your toes and look up at the ceiling by elevating your ankles. If it is impossible for you to stand on your tiptoes, you can maintain a flat foot position and gaze upwards.
● Hold the position for 20–30 seconds while taking regular breaths.
● Take a big breath in, then slowly relax as you bring your feet back to the ground.
● Ten times is a good number to repeat the pose afterward you can increase the count progressively. Before attempting the following repetition, take a 10-second break.
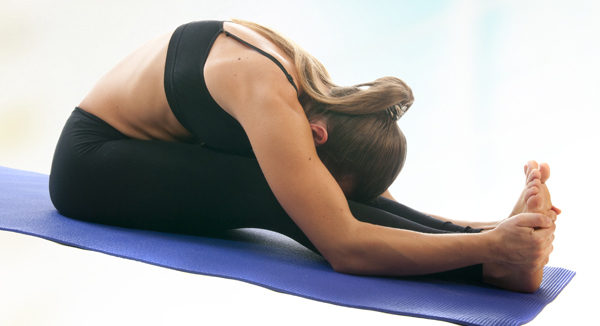
7. Paschimottanasana (Seated Forward Bend)
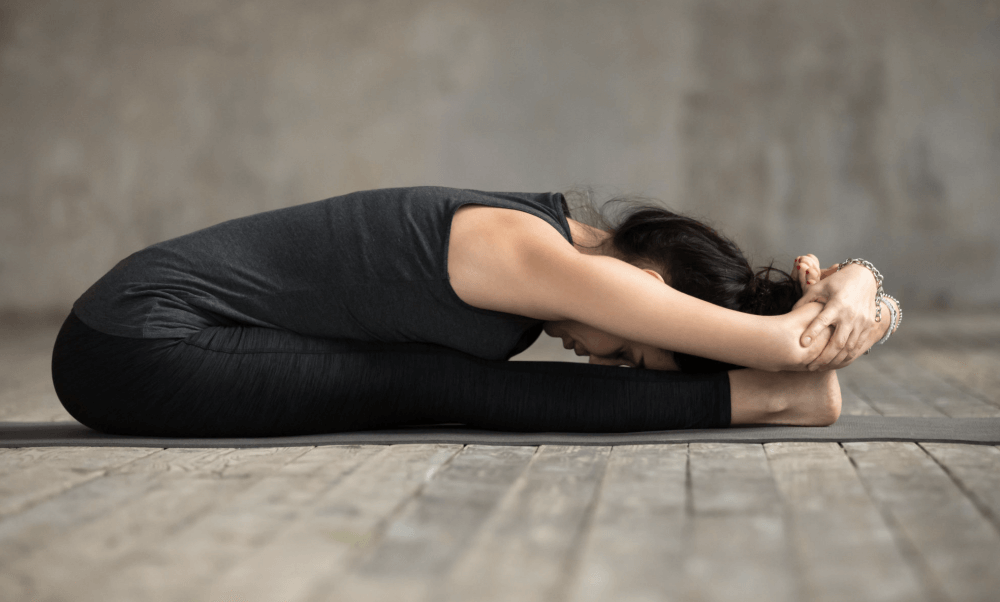
One of the fundamental poses in Hatha yoga, Paschimottanasana, stimulates the solar plexus area. The forward bend delivers a commendable amount of stretch to the hamstrings, thighs, and hips in addition to serving as a tummy-toning pose. It is also excellent for people who frequently experience digestive issues.
How to do
Paschimottanasana
● Stretch your legs out in front of you while maintaining a straight spine. Your feet should be pointing upward.
● Stretch your hands above your head while taking a deep breath. Do not bend your elbows. Your hands and gaze should move in unison. Make the most of your spine’s flexibility.
● Take a breath out before bending forward, lowering your hands, and attempting to touch your toes. Your knees should support your head. As a starting point, beginners can try touching their ankles, thighs, or shins.
● When you feel a stretch in your hamstrings, grip your toes while attempting to draw them backward.
● First, aim to hold the position for 60 to 90 seconds while maintaining steady breathing. Increase the time you spend keeping the posture slowly until you can hold it for five minutes or longer.
● After exhaling, return to the Sukhasana or Padmasana stance by lifting your body upward and letting go of your toes’ grip on your fingers.
8. Surya Namaskar (Sun Salutation)
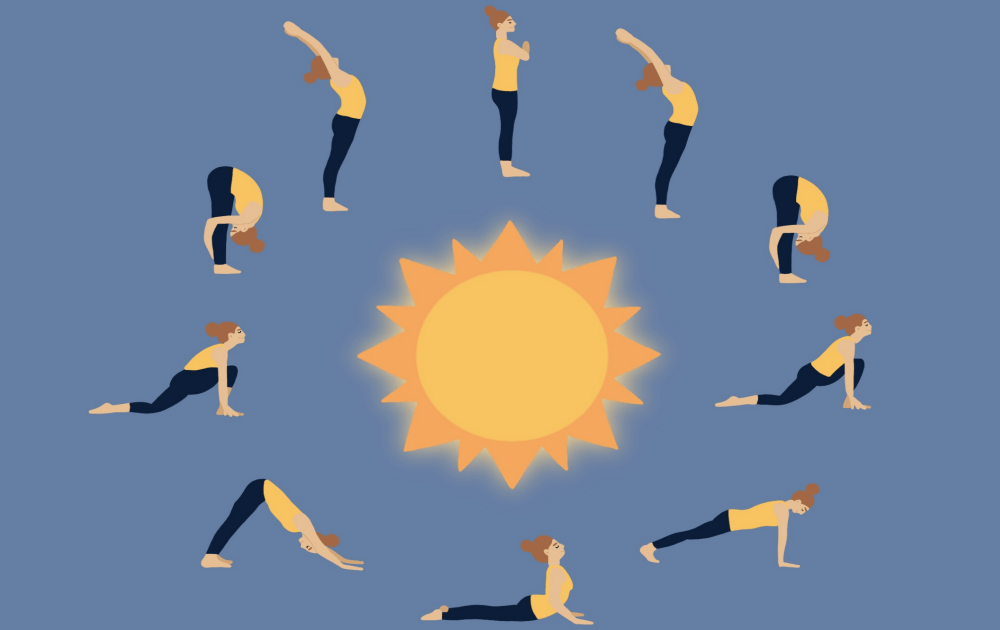
Twelve yoga poses are combined into the Surya Namaskar, each of which has a significant effect on the entire body. Stretches are made possible by the forward and backward bends, and the deep breathing that is done while doing the deed may aid in detoxification. For the greatest advantages, perform Surya Namaskar every morning while facing the sun.
How to do Surya Namaskar
● Expand your chest and relax your shoulders as you stand with your feet together.
● Lift both of your arms out to the sides as you inhale. Then when you exhale, maintain the prayer stance by bringing your arms to your chest in front of you.
● Take a deep breath in, raise your hands, and lean back slightly.
● Inhale, stoop forward and try to connect your knees with your forehead.
● Stretching your right leg back while bending your left knee, place your palms on the ground.
● Enter the downward-facing dog stance.
● Take a deep breath in, extend your arms in front of you, then bend back into the upward-facing dog position.
● Put your hands firmly on the ground and lower your torso into a downward dog.
● Bring your right leg forward, in front of your elbows, and extend your right leg upward as you inhale.
● As you take a deep breath, extend your left leg forward.
● Go back to your starting position.
9. Pavanamuktasana (Wind Relieving Pose)
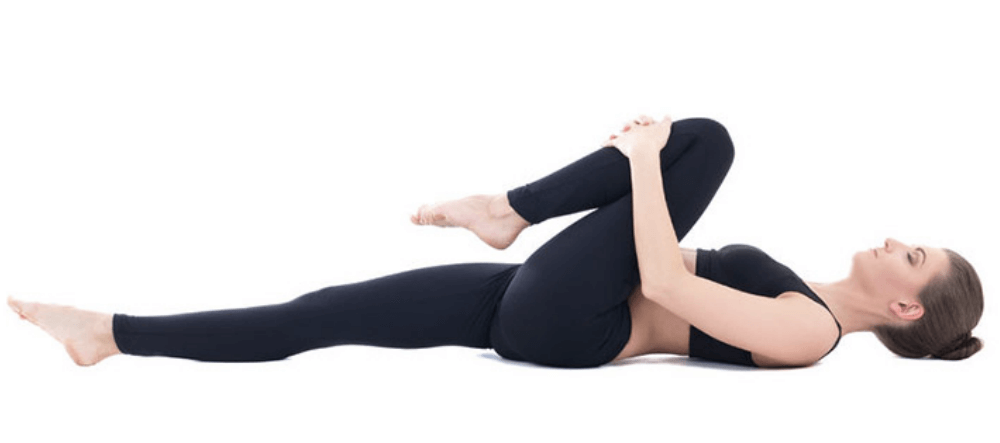
Apart from burning fat, constipation, and indigestion are only two of the stomach issues that Pavanamuktasana helps to treat. Holding the position for more than a minute may aid in initiating the burning of fat in the area since your knees put pressure on your stomach.
How to do Pavanamuktasana
● Face upwards while lying in the supine position, your feet should be spread out with the eels touching.
● Take a long breath in, and as you exhale, slowly raise your knees to your chest so that your thighs are pressing against your abdomen. By encircling the thighs with your hands, you may correctly secure the knees.
● Take another breath in, and as you let it out, lift your head so that your chin touches your knees.
● When inhaling deeply, hold the position for 60 to 90 seconds.
● Release your knees and let your head rest on the floor while you softly exhale. With your palms facing the ground, bring your hands to each side of your body.
● Shavasana is a pose for relaxation.
● Leave a 15-second gap between repetitions as you perform the pose seven to ten times.
10. Padahastasana (Standing Forward Bend)
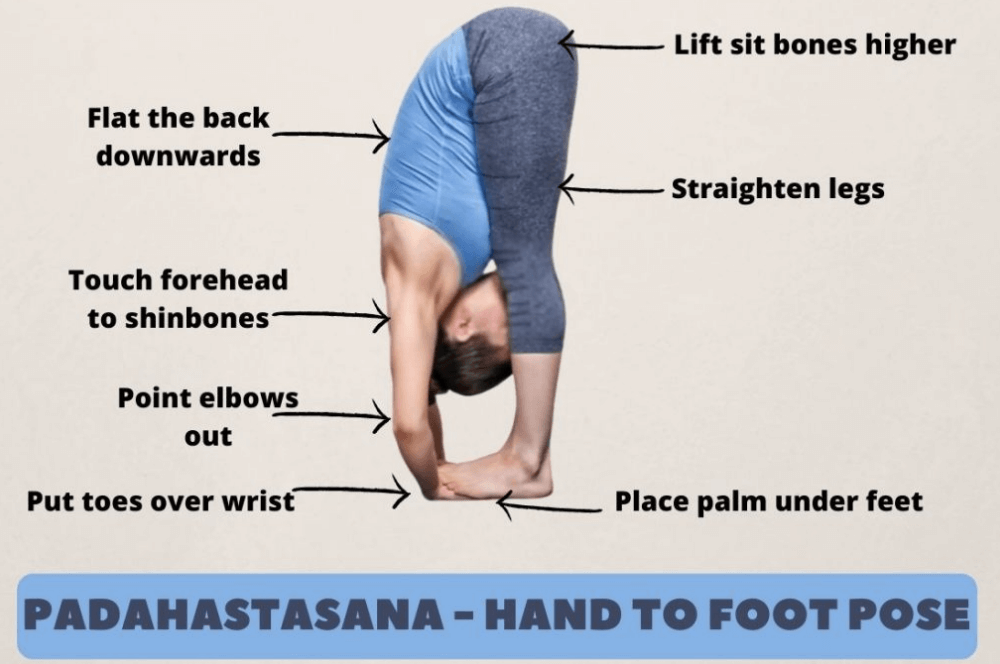
This forward fold improves problems like anxiousness and is great for getting the heart rate to settle down. It is also very helpful for the heart. By letting the stomach perform its job while the abdominals are soft and relaxed, you can potentially address big or small abdominal problems.
How to do Padahastasana
● In the Tadasana position, stand with your feet together and your heels touching while you place your hands on either side of your torso.
● Keep your back straight. As you take a deep breath, raise your hand.
● Exhale and stoop forward until your body is parallel to the ground.
● Take a deep breath in, then let it out as you completely bend forward, allowing your hips to drop away.
● Without bending your knees, try to contact the ground with your palms facing down. Beginners should start by touching their ankles or toes before progressing to the floor.
● Inhale as you ascend into Tadasana. It is beneficial to hold this pose for a little bit longer depending on your needs and skills.
Conclusion
Doing only yoga is not enough to attend to belly fat issues. You should focus on establishing healthy eating habits in addition to all of these yoga positions for losing belly fat. Moreover, ensure that your body is getting enough sleep because studies have shown that not getting enough sleep has a bad effect on your abs.


