 By myulikeadmin
Have you ever seen someone with straight and snatched eyebrows? And have you wondered how they are getting such glossy and sleek eyebrows? Most probably, they all have laminated their eyebrows.
Eyebrow lamination is a chemical treatment that removes any curl or tangle from the hair of your eyebrows. It is gaining popularity in beauty because of its clean makeup look. You get a beautiful set face without any heavy makeup and brow products.
Your eyebrows look fuller as this treatment fills the gap in them. Above all, you can get whatever shape you want per the trend or your face.
You can do it at home and get it done by an aesthetician. So, we’ll discuss how to laminate eyebrows at home and its care.
Table of Contents:
- Part 1: What is Eyebrow Lamination?
- Part 2: How to Laminate Eyebrows at Home?
- Part 3: Eyebrow Lamination Before and After
- Part 4: How long does eyebrow lamination last?
- Part 5: Cost of Eyebrow Lamination
- Part 6: Eyebrow Lamination Aftercare
- Part 7: DIY Eyebrow Lamination Tips
Part 1: What is Eyebrow Lamination?
 Eyebrow lamination is a restructuring process of eyebrows that gives a better shape and makes them tidy. People also call it eyebrow sculpting and eyebrow lifting. It is not a long-lasting solution or treatment. So, you have to repeat this treatment after some time.
Is this procedure similar to micro-blading?
Some people consider eyebrow lamination and microblading the same, but they are not.
In micro-blading, the dermatologist cuts your skin under the eyebrows and inserts pigments. Its procedure is similar to tattooing. However, no cuts or anything happens under your skin in eyebrow lamination. It is done on the eyebrows, not the skin under the eyebrows.
It is a simple process you can do at home and get it done in a Salon. Your eyebrows are lifted using a cream and brushed upward. You’ll have to apply a neutralizer to seal the cream and shape. This treatment can cause dryness, so it is finished with a nourishing oil.
Once you get eyebrow lamination done, you will see the following differences:
- Fuller and longer eyebrows.
- Detangled and cleaner look.
- The desired shape of eyebrows.
- Even directed hair.
- It is a non-invasive and almost nearly painless procedure.
- Thicker and bigger eyebrows.
Part 2: How to Laminate Eyebrows at Home?
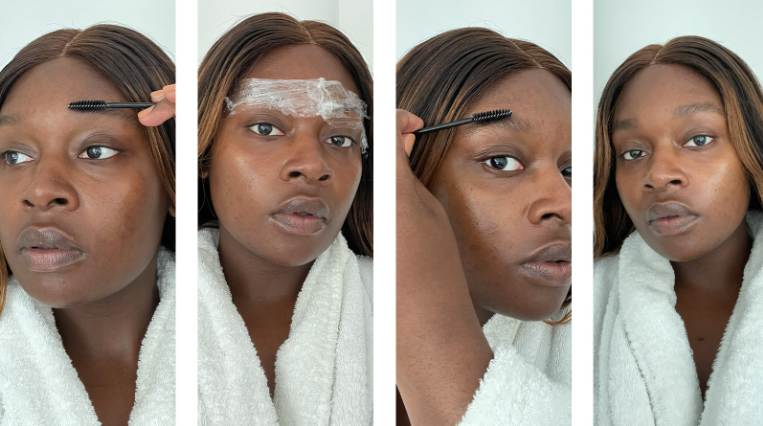 For eyebrow lamination, you will need a brow lift solution, a perming solution, and a nourishing oil. You can buy them as an individual item or buy an eyebrow kit. These kits have solutions that work well with each other, so there are very few chances of any mishap. Moreover, some tools like spoolie, eyebrow brush, plastic wrap, and Q-tip are also required.
Step 01: Protect Areas Around Your Eyebrows
This step is optional, but we recommend doing it. The skin around your eyebrows is sensitive and might irritate due to any product used for eyebrow lamination. So, it is necessary to create a protective barrier on it. You can use any thick cream like petroleum jelly, Aquaphor, or a lip balm.
Step 02: Clean Your Eyebrows
Before applying any product, clean your eyebrows to remove any dirt or bacteria. First, wash your face and pat dry it. You can use any cleaning solution or rubbing alcohol afterward to ensure your eyebrows are dirt-free.
Step 03: Set the Shape of Your Eyebrows
This initial setting step is to give your eyebrows the desired shape after lamination using eyebrow mapping techniques. You will use a brow lift solution with the help of a spoolie. Take some lift solution on the spoolie and brush your eyebrows to get the desired shape. Do this step with soft hands and each eye with the same side hand, the right eye with the right hand, and the left eye with the left end. The result of this step is to flatten the eyebrows with the skin.
Step 04: Cover it With a Perming Solution.
Wait for the lift solution to get semi-dry. Once it is tacky, apply the perming solution. You can use a Q-tip or brow brush to make the application easy to handle. This solution breaks down the eyebrow hair protein to make it sculptable. You need plastic wrap to cover the eyebrows to stay the same shape.
The tip hair is to leave this solution for a short time. If your perming solution says to keep it for 4 minutes, leave it for 3 minutes. As you must be quick, this practice will help you get better results. After this time, remove the sheet and the perming solution using water or a cotton pad.
Step 05: Finish it With a Nourishing Oil
The last step is to hydrate your eyebrows. You can use any nourishing, eyelash, or castor oil. These all are hydrating and do not cause irritation or inflammation on the skin.
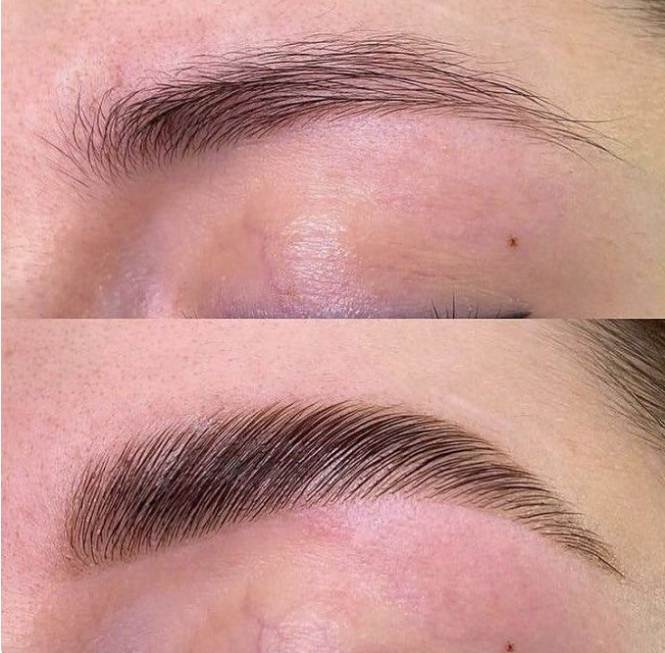
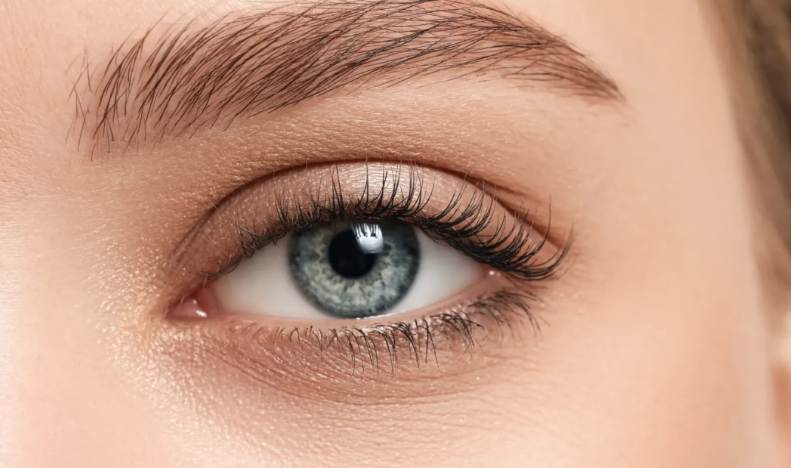
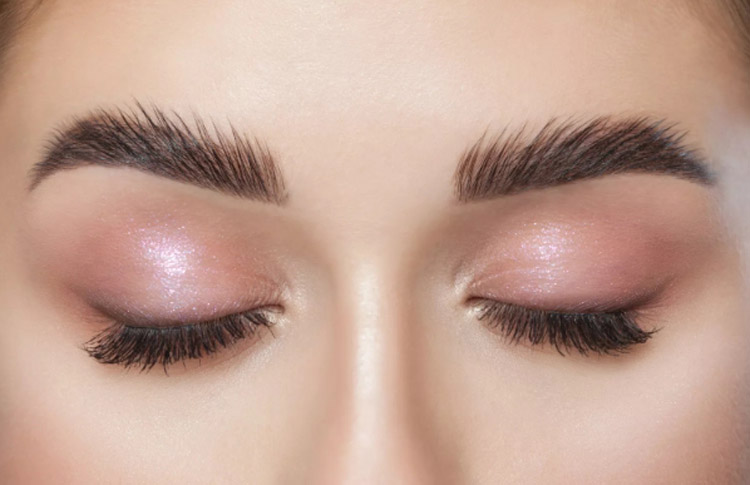
Part 3: Eyebrow Lamination Before and After
 You can see the before and after in the following picture. The lady had thin, tangled, and uneven eyebrows in the first or before photo.
On the other hand, in the second picture (after eyebrow lamination at home), she has achieved straight, even, fluffy, and snatched eyebrows. She has not altered the shape of the eyebrows much but tried to make the same shape.
Another transformation is of a student of the masterclass of Claudia Lousie. She has transformed her bushy and messy eyebrows into shaped, directed, and fluffy ones. You can yourself witness how clean her face looks even without anything. It is just a change in the eyebrows.
Part 4: How long does eyebrow lamination last?
The eyebrow lamination generally lasts for four to six weeks. The results vary from person to person and hair type. This treatment is not ideal for people with thin and fewer eyebrows. The eyebrows having strong downward growth are also not suitable for brow lamination. The hair will increase, and the treatment will not last for a maximum period.
However, this duration can extend to eight to ten weeks if you properly do aftercare. Aftercare is a must for laminated eyebrows to last longer.
Three main tips that can make or break your eyebrow lamination results are: for
- You must not wet your eyebrows before 48 hours after lamination. The lift and shape will drop if you water them within 48 hours.
- After 48 hours, we recommend you wet your eyebrows and brush them according to their shape.
- Do not rub and touch your eyebrows for at least 24 to 36 hours. It can disturb the shape.
Part 5: Cost of Eyebrow Lamination
 The cost of eyebrow lamination can be as low as $50 and as high as possible. The average price, you can say, is $85. The rates depend on several factors. Several factors are:
- Location
- Salon Reputation
- Esthetician
- Products used
- Competition or number of salons in the area.
If you are doing eyebrow lamination at home, the cost depends on the quality of the product. For example, a high-end eyebrow kit costs more than a local or drugstore product.
Eyebrow lamination is more cost-effective than micro-blading methods, which cost around 200 $ – $ 300 per session. But all methods have some pros and cons; micro-blading lasts for about two years, so it is a kind of one-time investment.
If you do not want to spend much on salon eyebrow lamination, use an eyebrow lamination kit for similar results. The only difference is that you will be doing it, so you need some precision and patience.
Part 6: Eyebrow Lamination Aftercare
 The eyebrow lamination can affect the overall health of the eyebrows. So, you should use nourishing products and other tips to improve the eyebrow health:
- Always apply nourishing serum once daily to get better results and more duration.
- If you do not have a nourishing serum or run out of it, you can use conditioner for a few minutes and wash it. Please do not leave the conditioner longer, as it might cause dandruff or dry eyebrows.
- Do not use exfoliating products like AHAs and BHAs right after eyebrow lamination. They may irritate the eyebrows.
- The lamination gives you a subtle color, but the tint will be removed if you use any data products around it.
- Never do heavy makeup for at least 24 -36 hours after this process.
Part 7: DIY Eyebrow Lamination Tips
Do you not want to spend this much amount on eyebrow lamination or any other treatment? So, you should switch to DIY methods. They do not last longer but can give you a perfect look for some functions.
One of the best alternative DIYs for eyebrow lamination is eyebrow soap. Here is how you can laminate your eyes at home:
- Clean your eyebrows using rubbing alcohol, makeup remover, makeup wipes, or any other cleansing solution.
- Pat dry your eyebrows, brush them to remove tangles, and set them in place.
- Take a setting spray and moisten the eyebrow soap. Rub the spoolie to take a little amount on it.
- Now brush your eyebrows using a spoolie in the desired shape,
- Once set, you can use an eyebrow pencil to fill the gaps and give them a neater look.
This DIY eyebrow is a one-time solution and will last for hours only. If you want results similar to those of the salon, you should opt for an eyebrow lamination kit. The results depend on the quality of the kit used and your expertise.
You can overdo your eyebrows, so please make sure you follow the steps mentioned earlier as they are.
Conclusion
Eyebrow lamination attracts most people because of its neat look. It gives volume and length to the eyebrows. So, people with fewer eyebrows can get fluffy and fuller eyebrows using eyebrow lamination.
If you do not want to see your brows laminated for a longer time or need it for only one to two functions, or occasionally, you can go for DIYs and buy an eyebrow lamination kit. You can use this kit for 8-10 eyebrow lamination sessions, so it is a good alternative. Eyebrow soaps are also very common in the market these days.
However, every treatment affects the health of the eyebrows. Therefore, you must properly take care of your eyebrows.